Post by Pooja on Apr 11, 2008 16:23:47 GMT
As promised , I've written a tut for the all the future graphic stars over here.
Its not the sig , but I guess this one will help out in learning various aspects such as selective coloring and curves and stuff. So here it is:
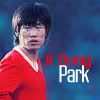
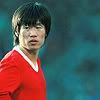
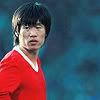
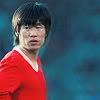
Well , this my first tut so pardon me for the mistakes. Today we will be making an icon like this :
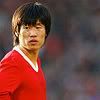
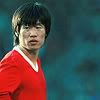
Take your base and crop it (100X100 ).Then duplicate the layer (Ctrl + j ) and set to screen if its too dark. Mine is good enough so I just sharpen it once. And then reduce the opacity if its too sharp.

Here comes the important part , now make a new raster layer and fill it with the colour #e21809. (basically just a bright shade of your render colour.) And set to saturation. Fiddle around with the opacity until it looks good. Its looks aweful right? Well just take a soft brush and erase everything apart from the shirt.
Now make a new layer and go to Image>Apply image or just press Alt+Ctrl+Shift+E. Then go to Image>Adjustment>Seletive colour.
Fill in the following settings:
Yellows : +68 , +41 , -41
Whites :+23 , -37 , +36.
Press ok.
Again make a new layer and Image>Apply Image. Then go to Image>Adjustment>Selective colour. Fill in the following:
Neutrals:+68 , -8 ,-11 and press ok.
Again make a new layer and apply image and then go to Image>Adjustment>Curves ,fill in the input as to input: 170 and output :185
Ok last of this apply Image thing, do again and then go to Image>Adjustment> Colour Balance. Fill in the following:
Midtones :-15 , -24 ,+1. Make sure that the preserve luminosity option is checked and then press ok.
Now make new layer and Image>Apply Image. oops this the last one. Then reduce the opacity to 17. and press ctrl+t. And then drag a little to the right.
Text: Well I am aweful at text so do what ever you like , but I'll tell you what I did.
Take the font "As seen on TV" Font sixe: 3pt and colour: Red. And write :Ji Sung".
Make a new text layer and chance the font colour to white (or the colour of your render's T-shirt.) And the font size to 4.52 and write Park.

Well , I wanted a bit more blue around in the background so I made a new layer Image>Apply image and then image>Adjustment> Selective colour>
The following settings:
Neutrals:0, 9 , -24.
And then save your file your done.
PSD:http://rapidshare.com/files/106044897/p9.psd.html
Hope this helps some people and I'll be eager to see your outcome.
Its not the sig , but I guess this one will help out in learning various aspects such as selective coloring and curves and stuff. So here it is:
Well , this my first tut so pardon me for the mistakes. Today we will be making an icon like this :
Take your base and crop it (100X100 ).Then duplicate the layer (Ctrl + j ) and set to screen if its too dark. Mine is good enough so I just sharpen it once. And then reduce the opacity if its too sharp.
Here comes the important part , now make a new raster layer and fill it with the colour #e21809. (basically just a bright shade of your render colour.) And set to saturation. Fiddle around with the opacity until it looks good. Its looks aweful right? Well just take a soft brush and erase everything apart from the shirt.
Now make a new layer and go to Image>Apply image or just press Alt+Ctrl+Shift+E. Then go to Image>Adjustment>Seletive colour.
Fill in the following settings:
Yellows : +68 , +41 , -41
Whites :+23 , -37 , +36.
Press ok.
Again make a new layer and Image>Apply Image. Then go to Image>Adjustment>Selective colour. Fill in the following:
Neutrals:+68 , -8 ,-11 and press ok.
Again make a new layer and apply image and then go to Image>Adjustment>Curves ,fill in the input as to input: 170 and output :185
Ok last of this apply Image thing, do again and then go to Image>Adjustment> Colour Balance. Fill in the following:
Midtones :-15 , -24 ,+1. Make sure that the preserve luminosity option is checked and then press ok.
Now make new layer and Image>Apply Image. oops this the last one. Then reduce the opacity to 17. and press ctrl+t. And then drag a little to the right.
Text: Well I am aweful at text so do what ever you like , but I'll tell you what I did.
Take the font "As seen on TV" Font sixe: 3pt and colour: Red. And write :Ji Sung".
Make a new text layer and chance the font colour to white (or the colour of your render's T-shirt.) And the font size to 4.52 and write Park.
Well , I wanted a bit more blue around in the background so I made a new layer Image>Apply image and then image>Adjustment> Selective colour>
The following settings:
Neutrals:0, 9 , -24.
And then save your file your done.
PSD:http://rapidshare.com/files/106044897/p9.psd.html
Hope this helps some people and I'll be eager to see your outcome.